 WebMail
  Support
Email Documentation
Using Business or Enterprise Email Services
Key for Documentation
- Adding Email Account: Shows you how to add an email account to your service.
- Manage User: How to change password.
- Using Webmail: Using your browser to access your email.
- Using Email Client: Some basics to get you started in Outlook, Microsoft or Apple Mail.
- Email Management: Checking Spam, Message Delivery tracking, and other specifics for a user.
ENTERPRISE and BUSINESS EMAIL DOCUMENTATION
CLICK IMAGES TO ENLARGE

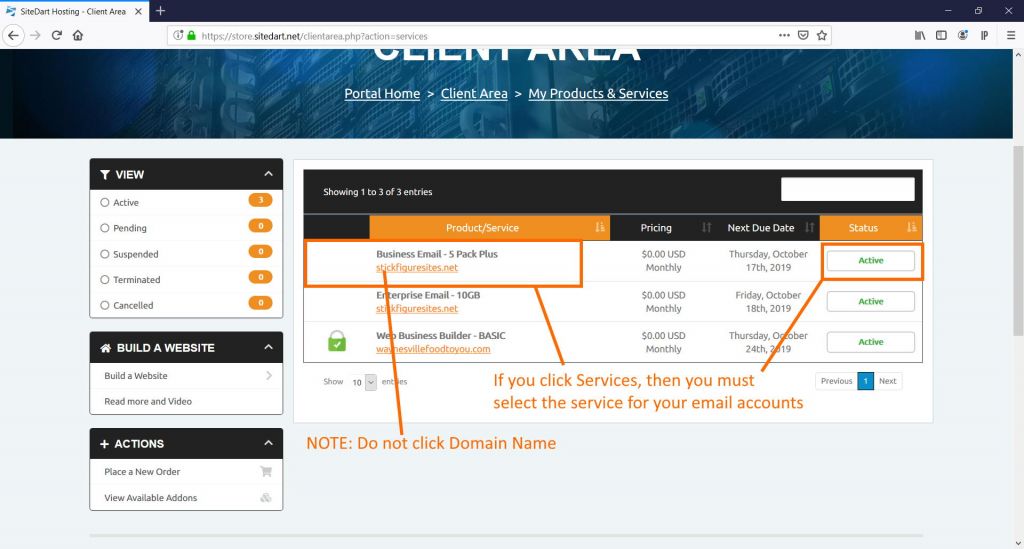
Upon logging in to your customer panel (https://store.sitedart.net/clientarea.php), this interface allows you access to various features for your hosting.
Find your subscription either under ‘Services’ or ‘Your active products/services..’ area. Using the second area is the quickest way to your main email subscription (see image above).
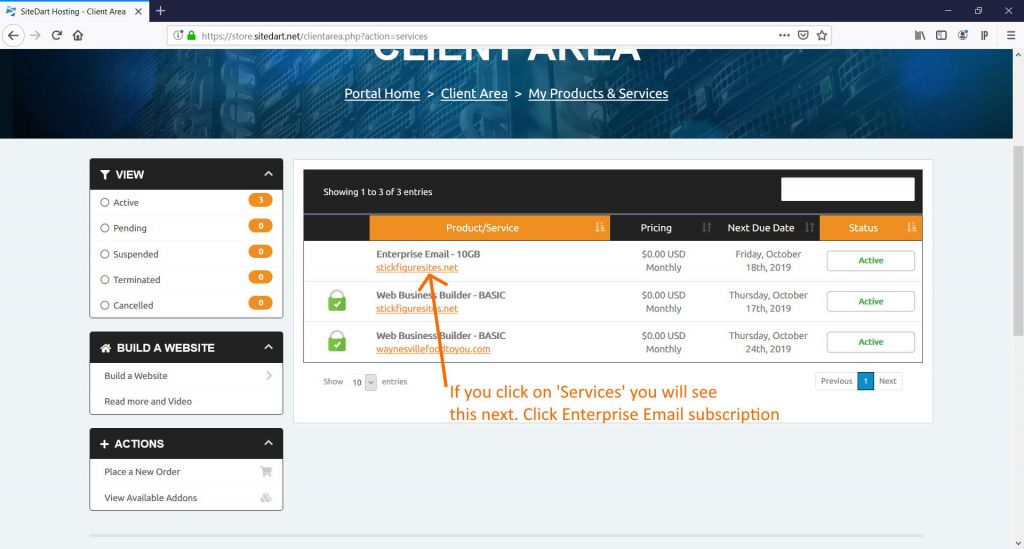
If you selected services, you may click on the subscription name, or the word ‘Active’. NOTE: Do not click on the domain name as it is linked to your website, not your subscription.
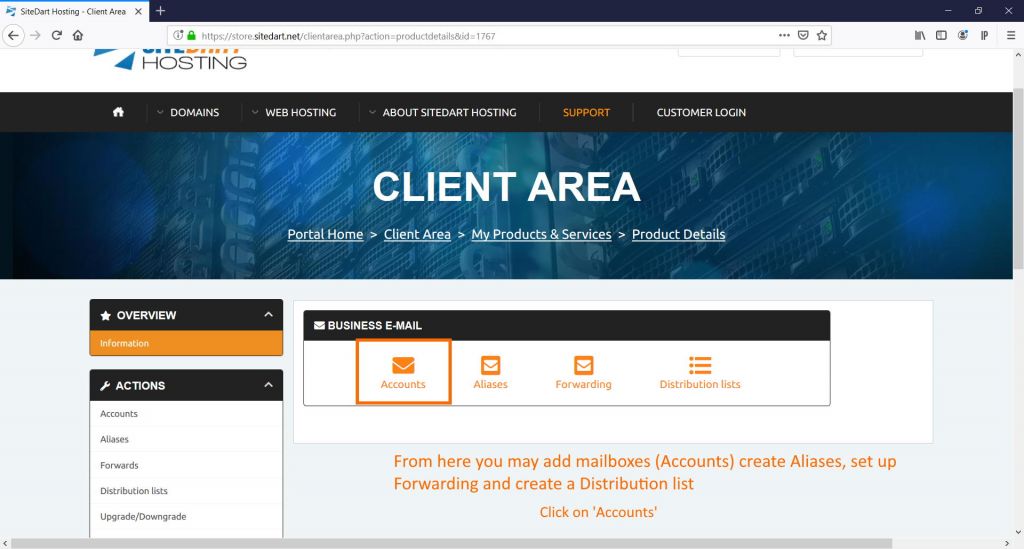
Once you are in the client area of your subscription, you now have a few options (see image for further details).
Accounts: Access account feature like creating mailboxes.
Aliases: Create a unique alias to direct mail to select mailboxes.
Forwarding: Forward copies of emails to various users.
Distribution: Create a central list of users for specific email addresses

Clicking on ‘Accounts‘ brings you to the mailbox screen. From here create new mailboxes or access management for a mailbox.
NOTE: You can import from a CSV if you wish to add a lot of email addresses at once. If you do not understand how to use this feature and have more than 10 users to add at once, please open a ticket for assistance. (https://store.sitedart.net/ticket)
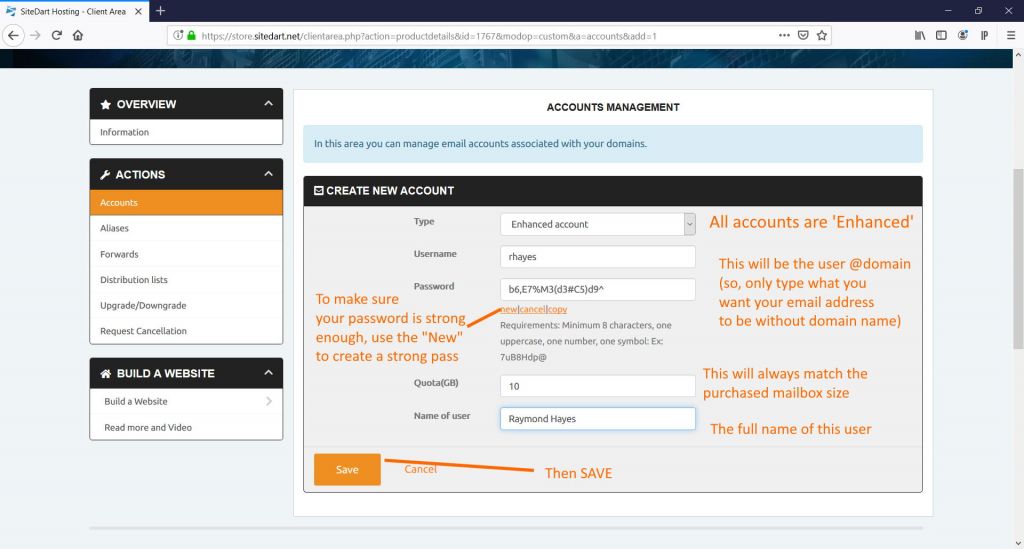
For this section, you can add the information for a new user to add their mailbox. (See image above). You may only add as many mailboxes as matches your email plan. If you need more email addresses, contact us or use the ‘Upgrade’ feature for your subscription.
CLICK IMAGES TO ENLARGE
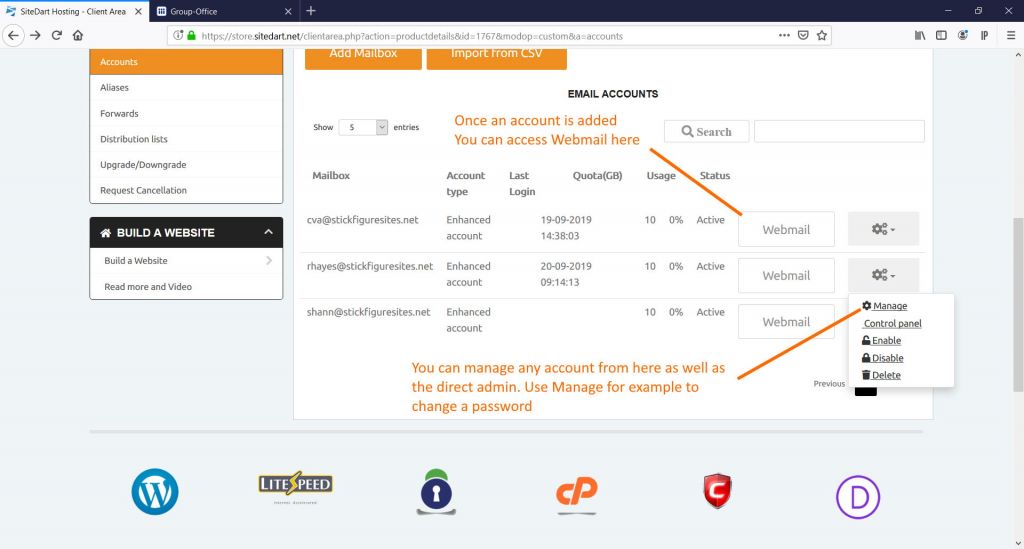
Review the image above. Once a mailbox has been added, you may manage the mailbox in various ways…Using the management menu.
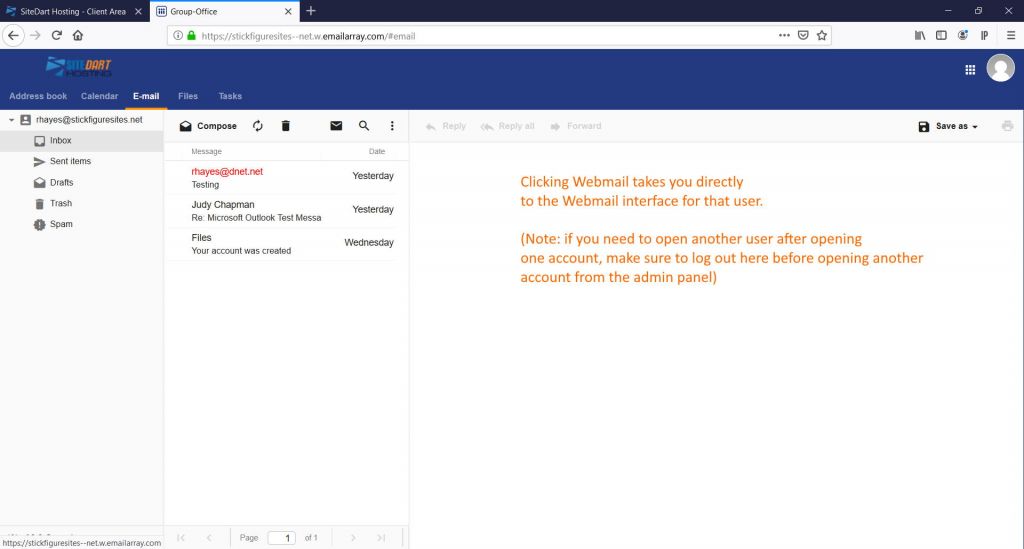
Webmail: Click to access that users webmail. This is specific to administrators…the controller of the main account. See ‘Using Webmail‘ on how to access webmail as a user.
Manage: This allows you to change that users password.
Control Panel: This gives access to features for that user. The user may also access this in their webmail. This is most helpful for tracking emails sent by that user, checking for spam, etc (Usage is explained in ‘Email Management‘)
You can Enable, Disable and Delete accounts from this menu as well.
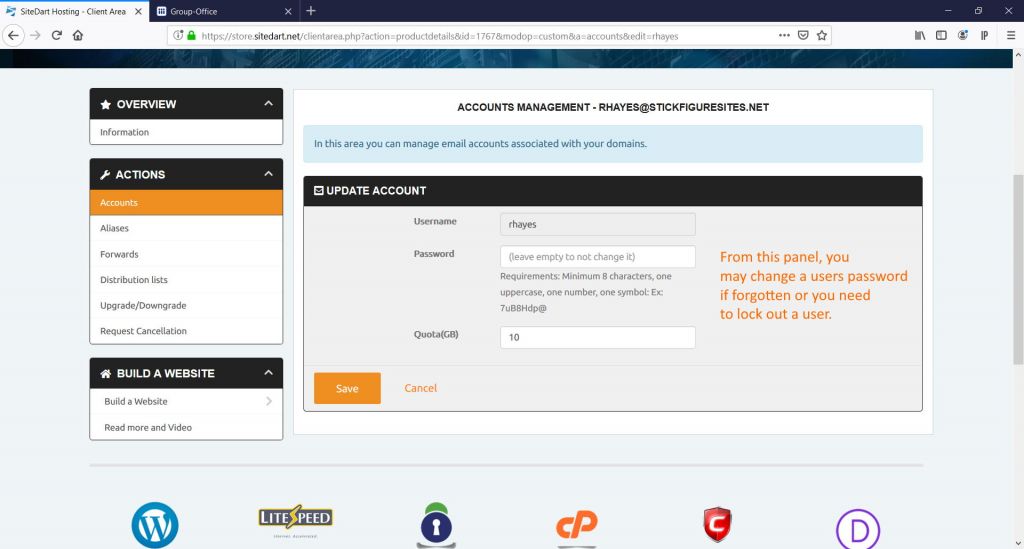
Click ‘Manage‘ for example to change a users password.
CLICK IMAGES TO ENLARGE
To access Webmail…
As ADMIN: Use this feature in your email admin panel (see ‘Manage User‘). Click button to access the webmail for that user.
As USER: Webmail is located at https://webmail.YOURDOMAIN. Example: if your domain is joestax.com, then go to https://webmail.joestax.com or https://joestax.com/webmail
Once logged in, you are taken directly to the inbox for email.

If the account is new, then you may wish to edit the account. Click the image to the right and select ‘My Account‘. (see image above)
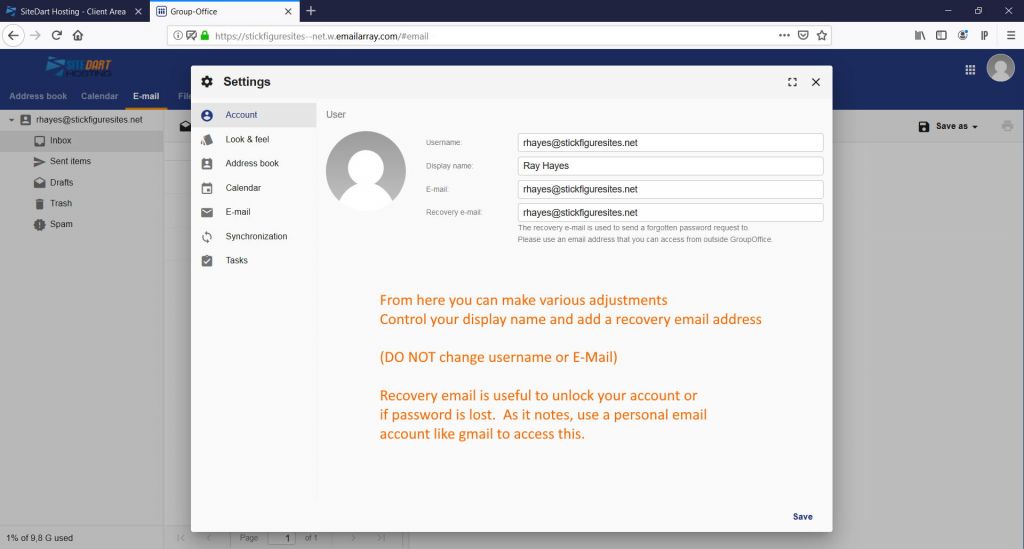
This screen allows several adjustments to the account. (see image above)
Account info: Like real name, and controls like the look and feel. Most sections can be left alone.
Other aspects may be controlled here. Review and adjust as needed.
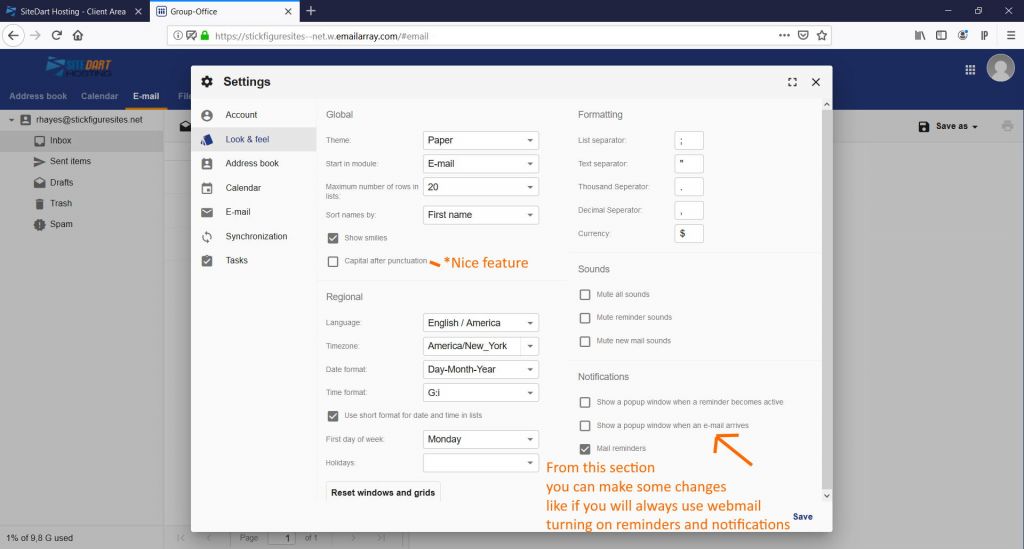
Under ‘Look & Feel‘ you have the ability to be notified when new mail arrives. Review the image above for further features.
When setting up email clients, there are many various solutions available.
Setup will normally be according to your mail client.
MICROSOFT or APPLE MAIL: These will normally require manual setup. If you are not experienced with a PC, please seek a local PC technician or IT support to help. When adding an email account, just make sure to use custom or manual setup. The following settings will work for most email clients.
IMAP.domain: Incoming Server: imap.emailarray.com. Use IMAP to leave mail on the server when checking received mail and not on your PC. You must make sure to clean trash regularly (by purging the trash items) Use port 993.
POP.domain: Incoming Server: pop.emailarray.com. Use POP if you wish to download your mail to your PC when checking email. This gives you more control over backups and archiving on your local PC and doesn’t use your disk space of your mail account. We suggest some form of PC backup software that captures mail as well. Use port 995.
SMTP.domain: Outgoing: smtp.emailarray.com (REQUIRED) Use this in your outgoing settings to send email. You will have two ports to choose from. Use port 465 to secure connection on your PC. Use port 587 to use server security. This may change depending on which works with your email client. But, this may also be decided by your antivirus or firewall software (for example, some software blocks port 465, so will require 587. Each are secured, just in a different manner. 465 is preferred.)
OUTLOOK OR THUNDERBIRD: Each of these clients will do ‘auto setup’. So, when adding an account to either mail program, just follow your directions to add an email address. You should only have to enter your email address and your password to connect to the Enterprise Service. Your software will ask to download a file and do setup for you.
If you have issues with this format of setup, you can either use the settings above for manual setup, or contact support (https://store.sitedart.net/ticket).
Mobile Devices: Mobile devices like smartphones and Ipad also do ‘auto setup’. Just add your email address and password in your favorite mail client on your phone to check email.
(*ENTERPRISE ONLY*) A feature available with Outlook is ‘Activesync’. Any appointments and contacts you may add on your PC will be in sync with your phone to allow notifications of upcoming events and address book searches. Adding events on your phone will auto sync with your PC as well.
If you wish to enable the Activesync feature with Outlook on your Windows PC to sync with your Mobile device and Webmail system, then use the following links to download software to your PC for use. Choose the version for your operating system.
Outlook sync for 32bit Operating Systems
Outlook sync for 64bit Operating Systems
To sync your Outlook calendar, specify these values in Outlook Sync plugin:
DAV Server = https://al.emailarray.com/dav.php
Use your email address and password as credentials.
For Mac systems:
Use the URL below to sync calendars and contacts with Apple iCal or a mobile device like iPhone or iPad (they all support syncing multiple CalDAV or CardDAV folders via a single URL).
DAV server = https://al.emailarray.com/dav.php
Use your email address and password as credentials.
NOTE: Not all email clients are supported. Due to security updates, older software may not work properly. If you run into problems, make sure to open a ticket (https://store.sitedart.net/ticket). We must know what Operating System and what email program. The Easiest fix is to use Thunderbird by Mozilla. This is 100% free, and has the most features of any email program available (except for Outlook). It is also the most compatible program available for email. It even works on Mac.
CLICK IMAGES TO ENLARGE

The users control panel for email is easily accessible via these methods.
In Webmail: Select the option in the upper right after clicking your picture (see image above)
Via Web Browser: A user can go to cp.YOURDOMAIN and login with their email address, to access the settings directly.
Via Admin: While logged in to customer panel, click the gear to the right of an email address and select ‘Control Panel‘ (only for admins who have access to the customer panel at https://store.sitedart.net/clientarea.php)

Lets review options. First up is a ‘Vacation Message‘. If you will be away for an extended period of time, use this to set a message that will be sent to those emailing you.
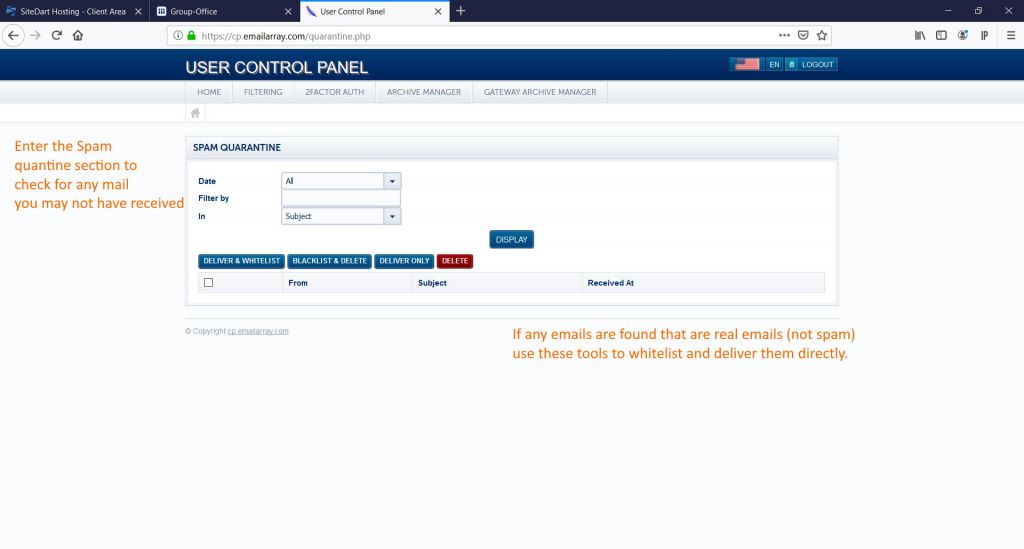
Next is ‘Spam Quarantine‘. This is one of the tools you should use of you are missing an email. It may have been marked as Spam. From here you can release messages to be sent to you if caught in the filter.
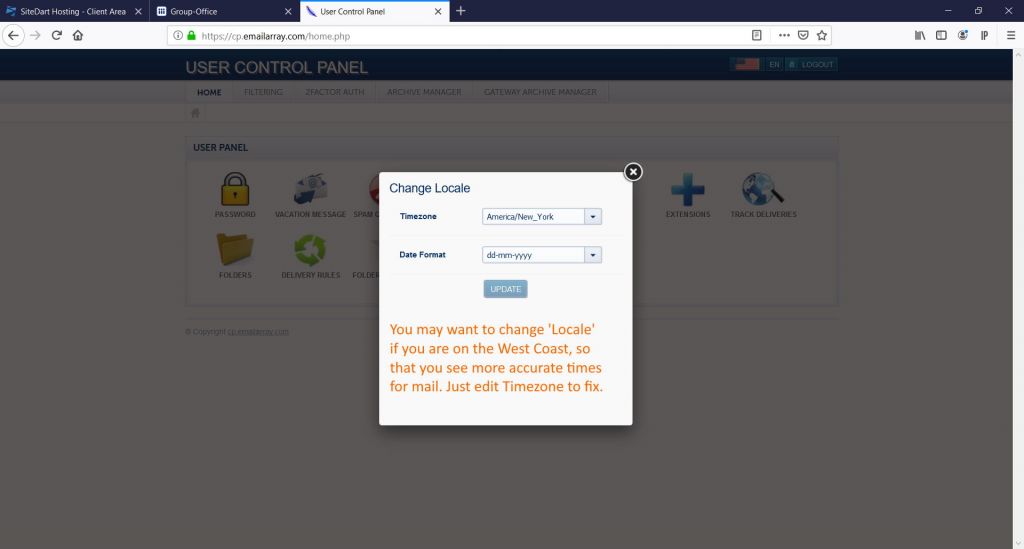
‘Change Locale‘ allows you to set your timezone for all email and Webmail services. Currently set to New York (EST) by default. Use this to find the closest city if you are in an alternate timezone.
Changing this will keep a more accurate schedule of when emails arrived.
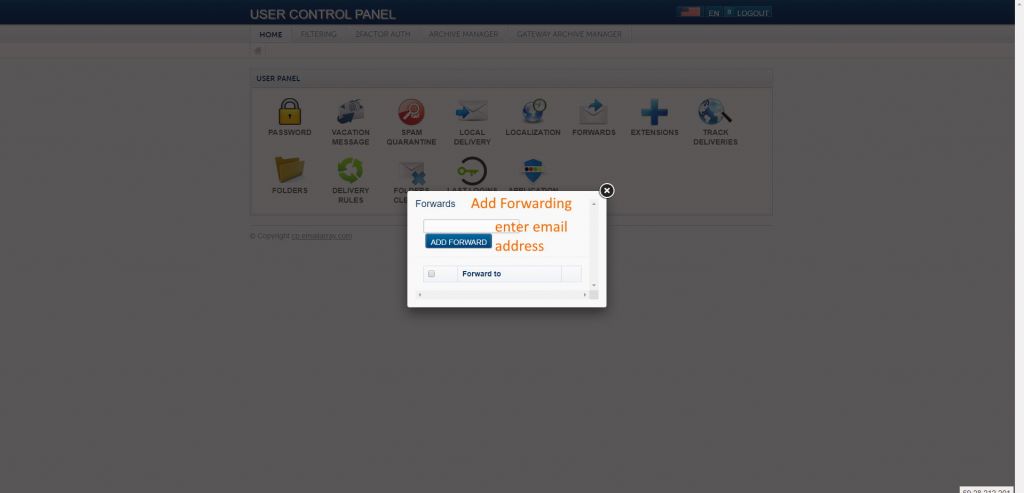
From here you can set up your ‘Forwards‘. Quick and simple…just enter the email address to forward email to.
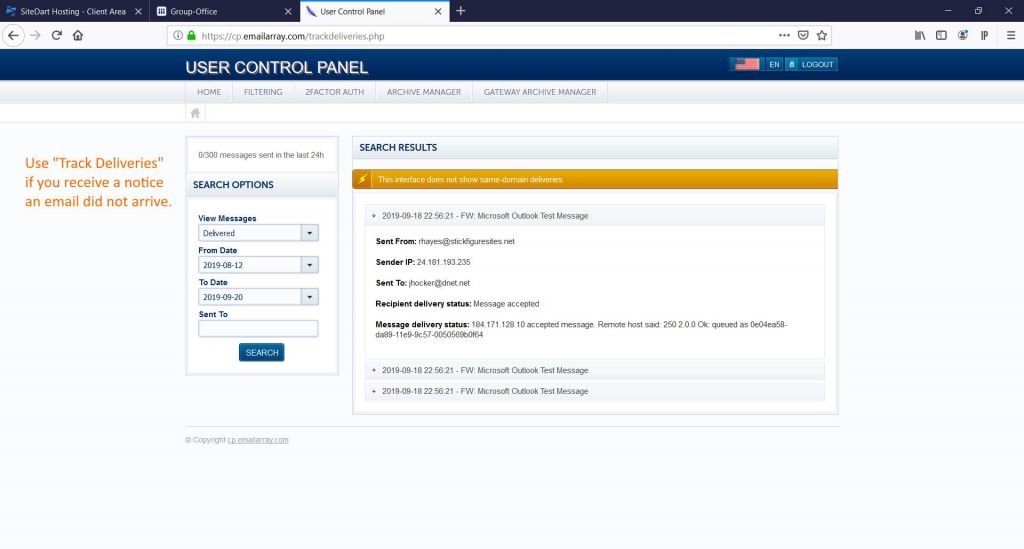
The ‘Track Deliveries‘ tool does just that. Track when emails were sent, and even track if delivered.
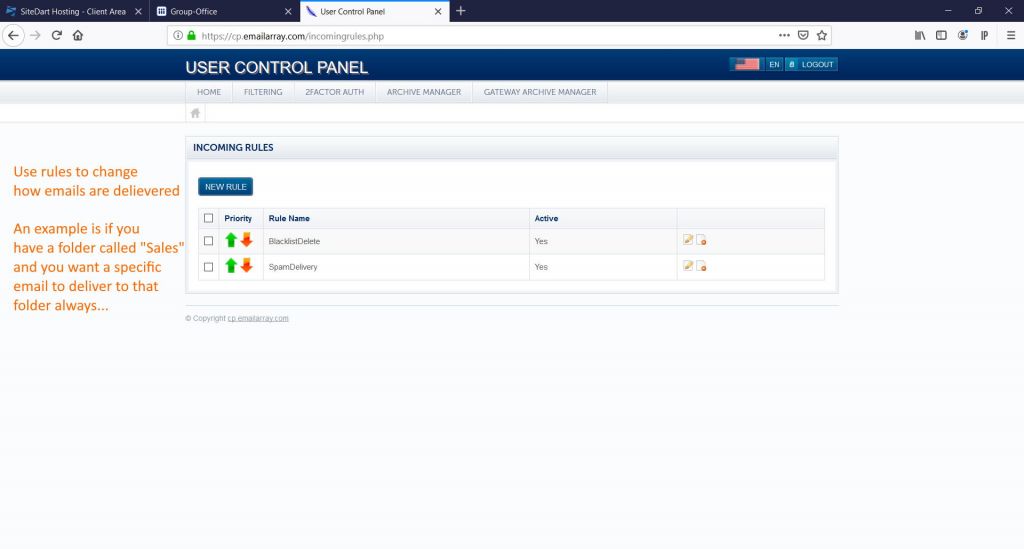
‘Delivery Rules‘ allow you to filter messages and place them into alternate folders or even discard specific messages, if not needed.
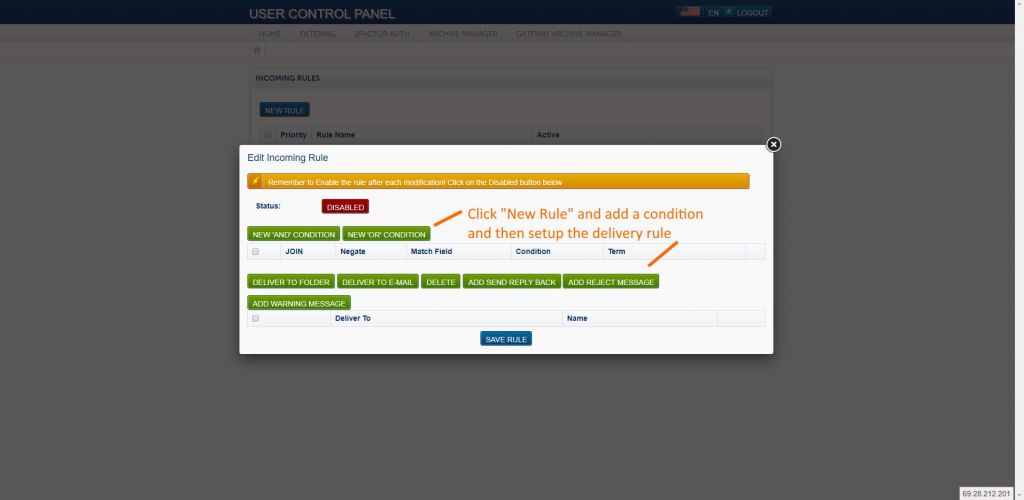
When adding a new rule, follow the format of adding and then editing the conditions of the rule. (see image above)
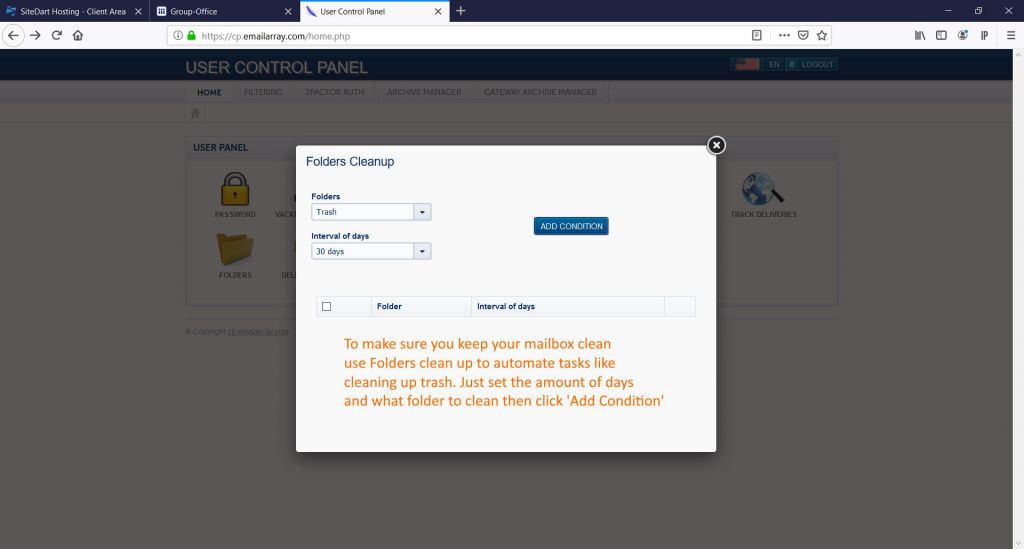
Finally, ‘Folders Cleanup‘ allows you to set schedules to clean up emails in folders. This is VERY important if you use IMAP. Mail continues to collect on the server and use up space…Using these clean up rules will automate this task for you.
BUSINESS EMAIL DOCUMENTATION (Grandfathered) – To see if you are a grandfathered account, go to https://webmail.yourdomain.com – If you see the words WEBMAIL in big orange letters, then you are a grandfathered account…
CLICK IMAGES TO ENLARGE

Upon logging in to your customer panel (https://store.sitedart.net/clientarea.php), this interface allows you access to various features for your hosting.
Find your subscription either under ‘Services’ or ‘Your active products/services..’ area. Using the second area is the quickest way to your main email subscription (see image above).
If you selected services, you may click on the subscription name, or the word ‘Active’. NOTE: Do not click on the domain name as it is linked to your website, not your subscription.
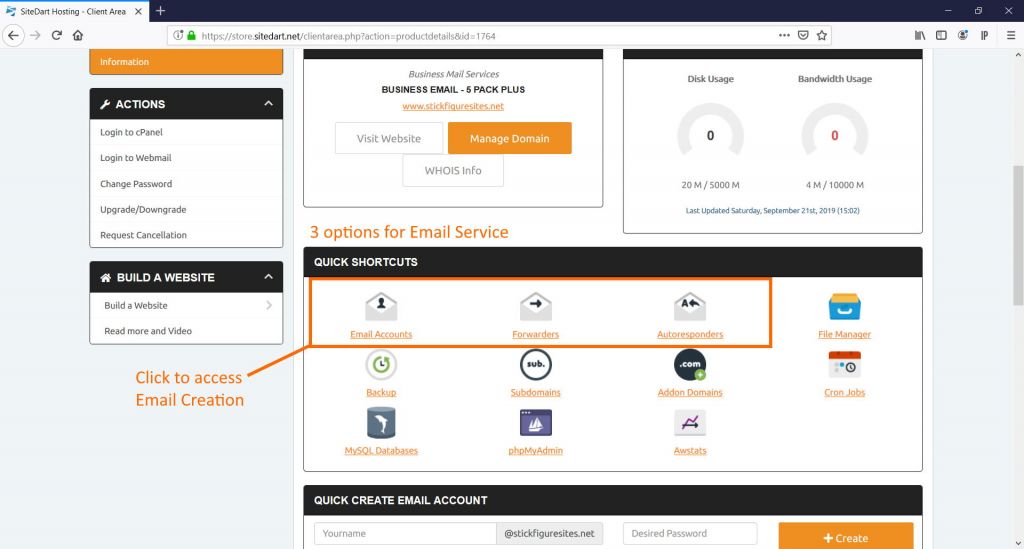
You are now in the administration area. You can click to get quick access to email account creation, autoresponders or forwards. Lets click ‘Email Accounts‘ to continue.
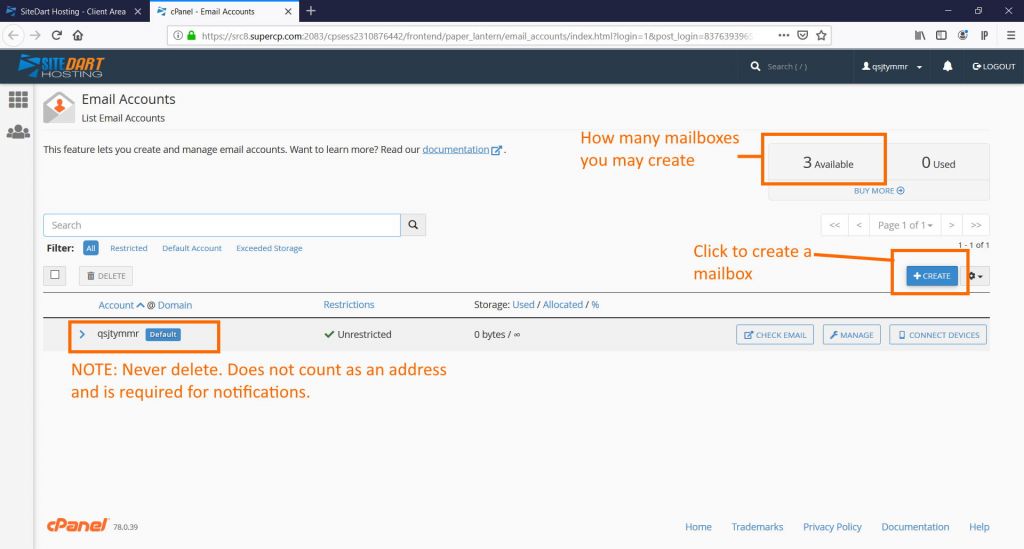
(see image above) – From this screen you get a quick glance at what accounts exist. How many accounts you can create and the management of the accounts. Click on ‘Create‘ in your admin panel to continue. For documentation, move to the ‘Manage User‘ section.
CLICK IMAGES TO ENLARGE

(see image above) – Note each step to creating an account. Add a username (we suggest first initial, last name. Some companies will use Firstname.Lastname@). Continue to follow the directions to add a password, set the amount of space the mailbox can user, etc.

Once the new email account is created, one more step should be completed. Click on ‘Check Email‘

The best option for Webmail is currently ‘Roundcube‘. Sometimes Roundcube may be the only option. If this changes in the future you will be notified. For now, set this as that new email addresses default webmail. You can also verify it is working by click on the ‘Roundcube’ box above default.
Do this now, and move to the next set of documentation ‘Using Webmail‘.
CLICK IMAGES TO ENLARGE
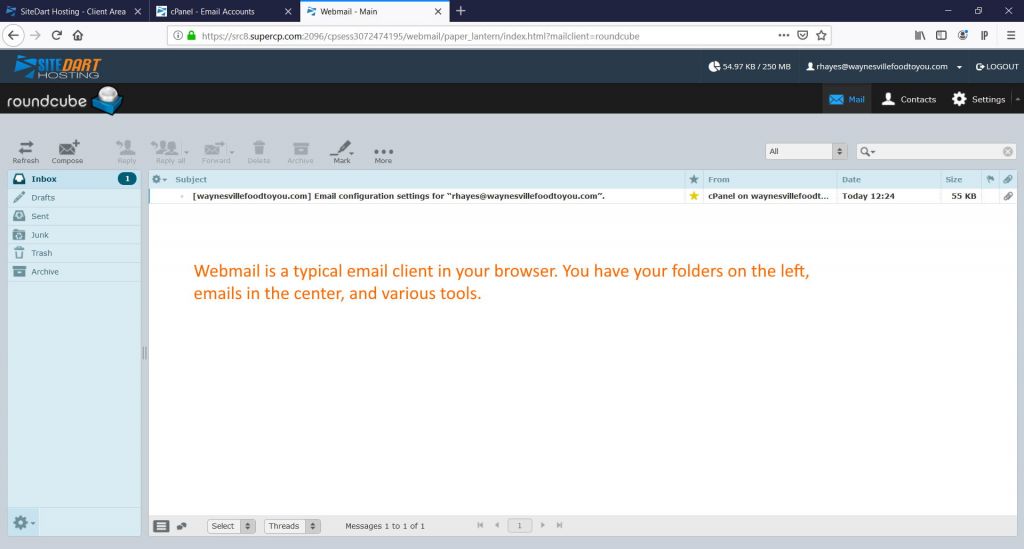
To access Webmail…
As ADMIN: Use this feature in your email admin panel (see ‘Manage User‘). Click button to access the webmail for that user.
As USER: Webmail is located at https://webmail.YOURDOMAIN. Example: if your domain name is joestax.com then go to https://webmail.joestax.com or https://joestax.com/webmail
Once logged in, you are taken directly to the inbox for email.

If you click on your email address in the upper right, you can access settings. Change your password, edit forwards, autoresponders and more.
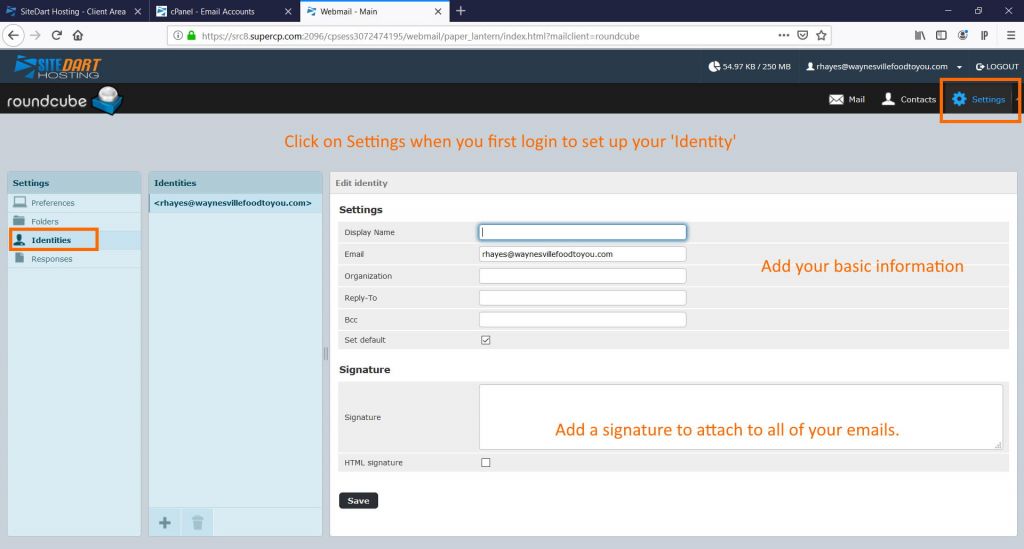
Click on ‘Settings‘ in the Webmail window. This takes you to your personal management for your accounts. We always suggest at a minimum that you edit your identity (click ‘Identities‘). Here you can edit your name as it will appear on your emails, and even add a signature.
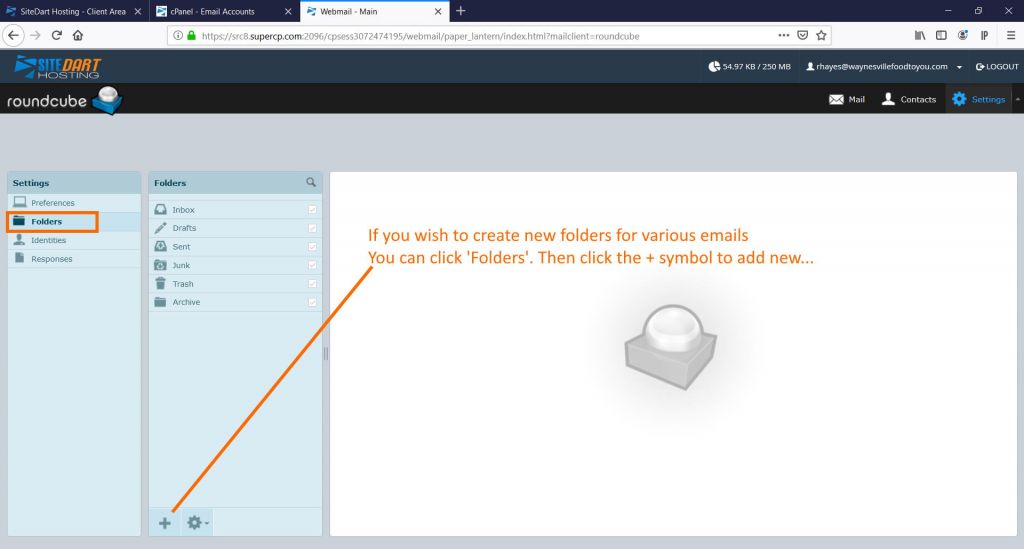
Adding additional folders to your Webmail to store mail in is easy. Just go to the ‘Folders‘ section and click the plus (+) symbol. Proceed to add new folders as needed.
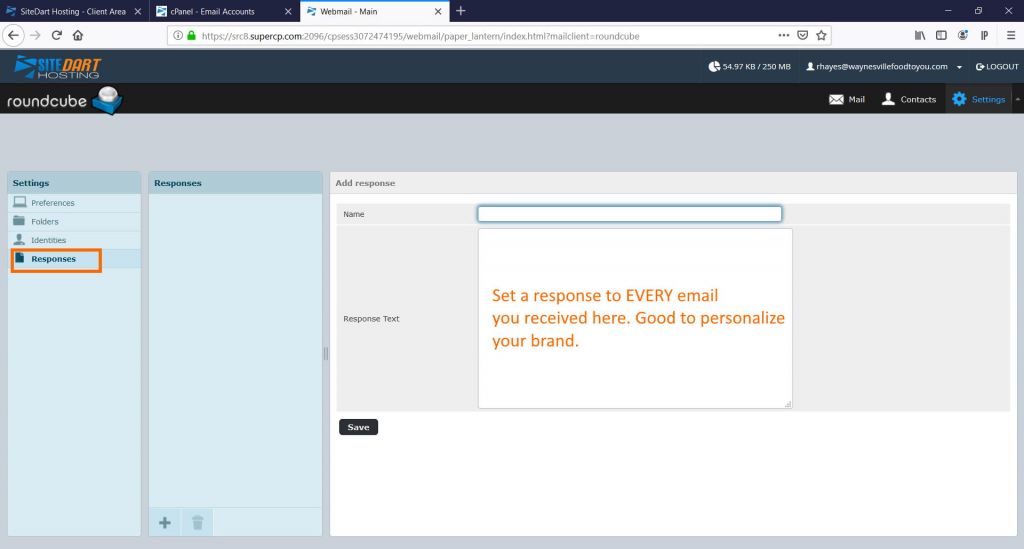
As a final option, setting a ‘Response‘ is a nice way to notify someone you have received their email. Be careful, as this could lead to complications, especially if you get a lot of spam or emails from subscriptions to newsletters. It could lead to failed emails afterwards.
We normally suggest you keep this off.
When setting up email clients, there are many various solutions available.
Setup will normally be according to your mail client.
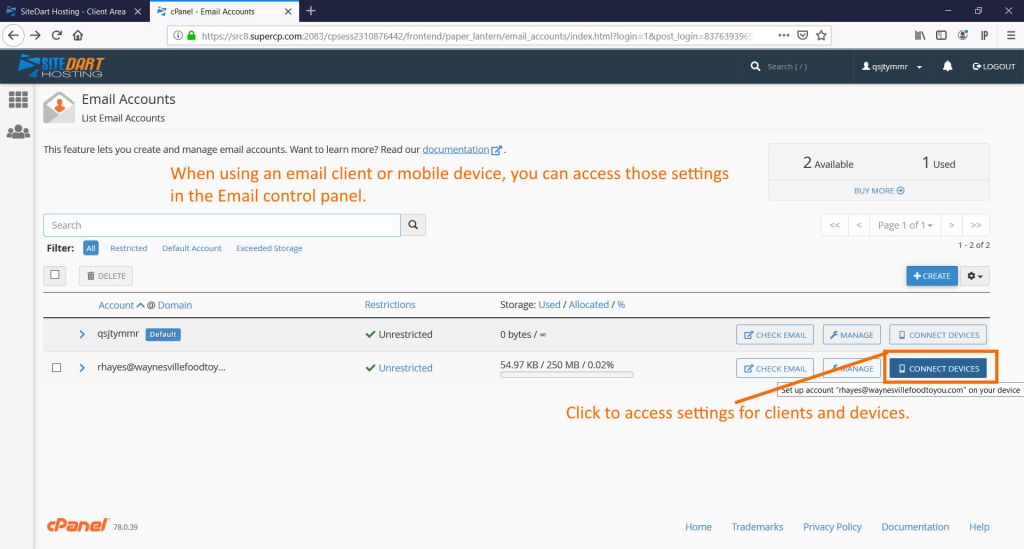
If you log into the email admin panel, you can access settings for email clients. Go to any email account (doesn’t need to be specific, as everyone will be the same except for the email address used) and click ‘Connect Devices‘.

From here you can find all of the various settings for email clients and devices. Some clients allow a file to be downloaded that will auto setup that client (Outlook for example). Select your client if shown. If the client does not exist in the list, you will need to do manual setup.
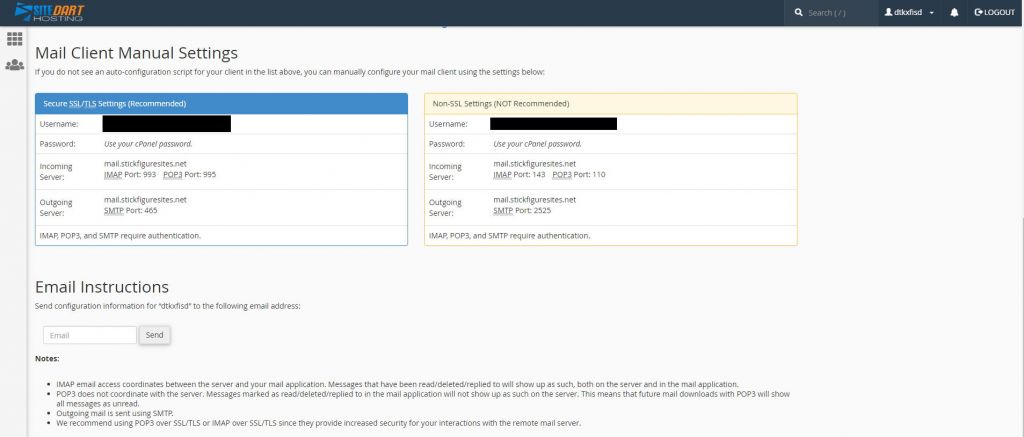
Scroll further down below the automatic setup files and you will find your manual settings.
NOTE: Not all email clients are supported. Due to security changes, older software may not work properly. If you run into problems, make sure to open a ticket (https://store.sitedart.net/ticket). We must know what Operating System and what email program. The Easiest fix is to use Thunderbird by Mozilla. This is 100% free, and has the most features of any email program available (except for Outlook).
CLICK IMAGES TO ENLARGE
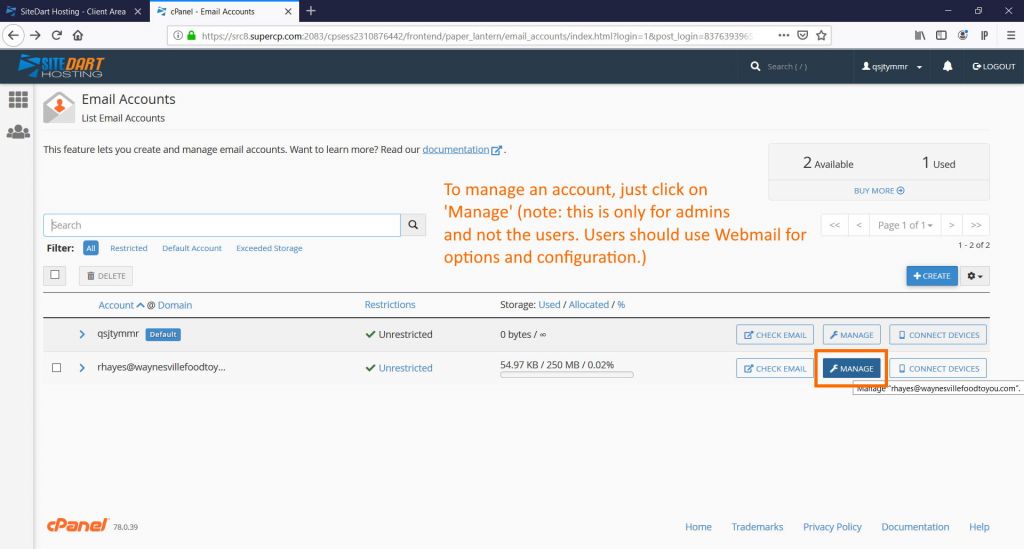
Admin access to the users control panel is easily accessible. After logging in to the email admin panel, click on ‘Manage‘ next to the email account you wish to edit.
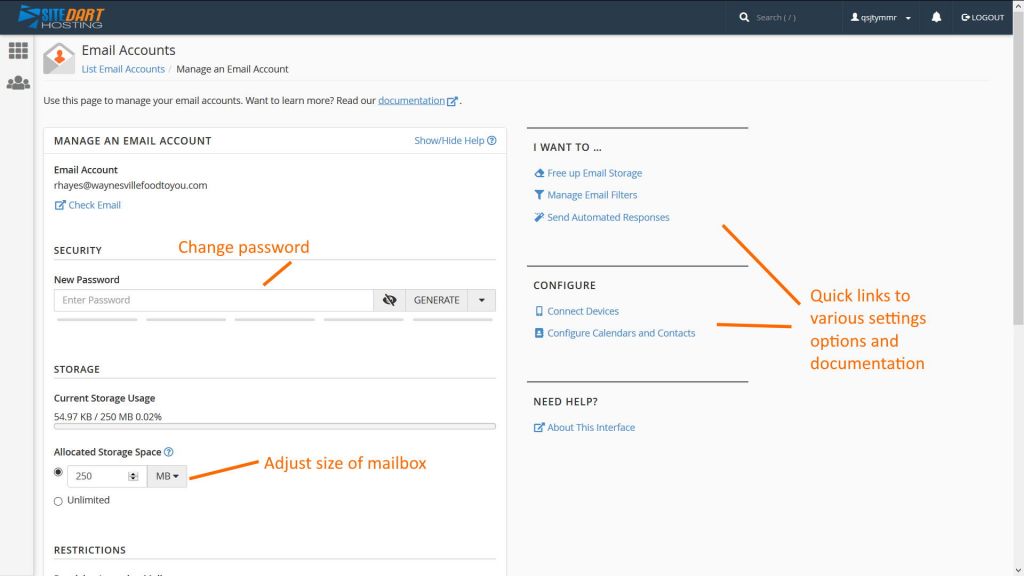
From this panel, you can quickly change the password, increase disk space and get some quick links to various settings.. (see image above)
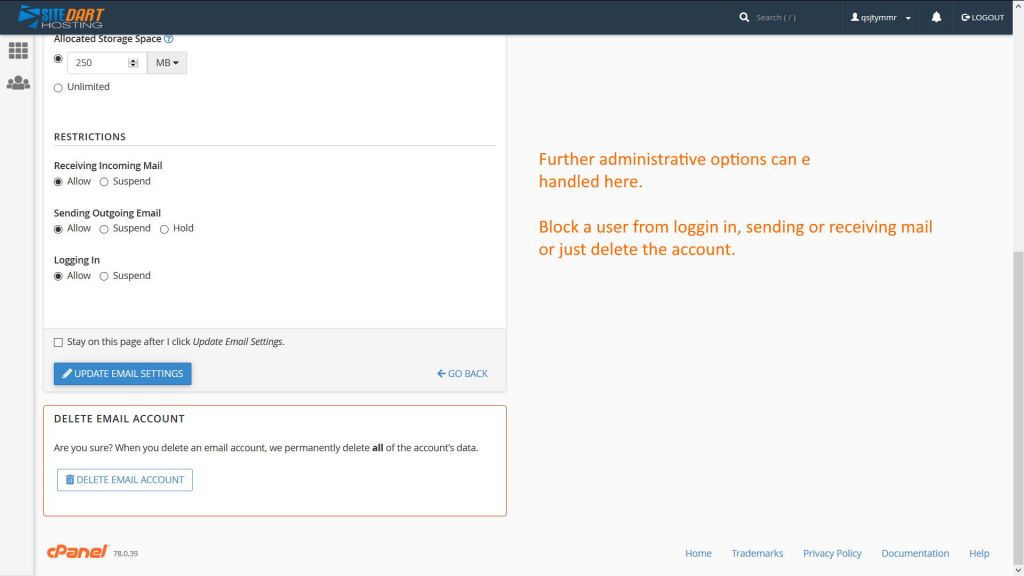
If you scroll down, you can also limit access to features. For example, block sending or receiving, and even remove an account completely.
(NOTE: Users can only manage their features using Webmail.)